
What is Digital Income Verification (argyle)?
Digital Income Verification powered by argyle begins with an automatic income check through Equifax's Work Number.
The applicant’s self-reported income entered during the online application process is automatically compared to available employment data provided through Equifax’s Work Number.
If additional verification is needed, applicants can securely connect their payroll or bank provider or upload income documents within the online application workflow. This approach reduces manual reviews, improves accuracy, and gives applicants flexible, convenient options to complete income verification.
*Tip: Check out the short video to see how argyle works within our application:
How to share your income and employment information with argyle.
Who Can Use Digital Income Verification (argyle)?
Digital Income Verification is available only for accounts using TenantTech's online application and meet the following requirements:
- The TenantTech account uses Western Reporting for screening.
- The account is enrolled in an Income Verification product with Western Reporting.
For more information about adding this product to your screening package, please contact sales@tenanttech.com.
What Applicants Can Expect During the Online Application Process
This section provides a brief overview of the online application process, with a closer look at the Digital Income Verification step. It is intended to help site teams understand what applicants may experience and what they may see as they complete this portion of the application.
Step 1: Start the Application
Applicant provided information is used to perform the initial income comparison through The Work Number:
- Personal Information
- Legal History
- Employment & Financial
Step 2: Income Verification Page
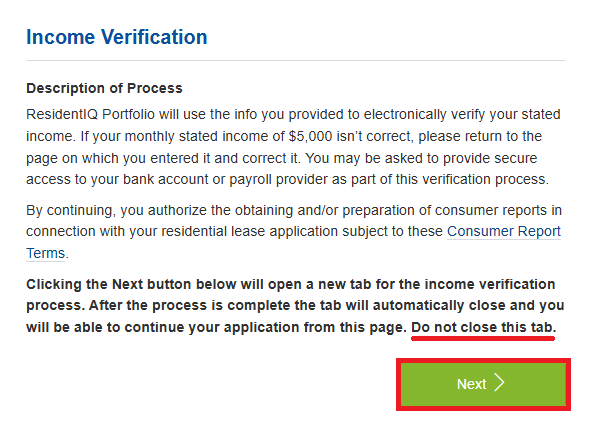
Applicants who identify as financially responsible at the start of the application will see a page explaining Digital Income Verification. To move forward, the applicant must consent by selecting Next. A new tab will open for the verification process.
Applicants should leave the rental application tab open while completing Digital Income Verification. When verification is complete, the new tab closes automatically, allowing the applicant to return to the application and continue completing and submitting it.
TenantTech compares applicant-reported details with Equifax’s Work Number data.
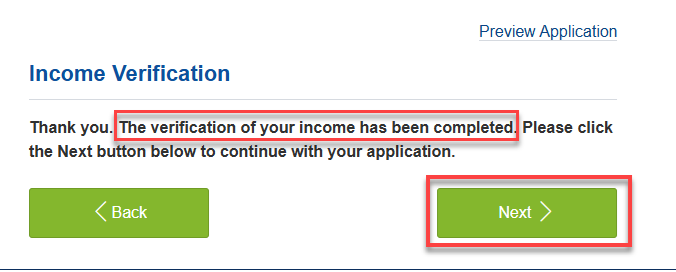
- If the applicant’s self-reported income matches what is verified through Equifax’s Work Number by at least 95%, the applicant will see the confirmation note shown below. They can then select Next to continue with their online application.
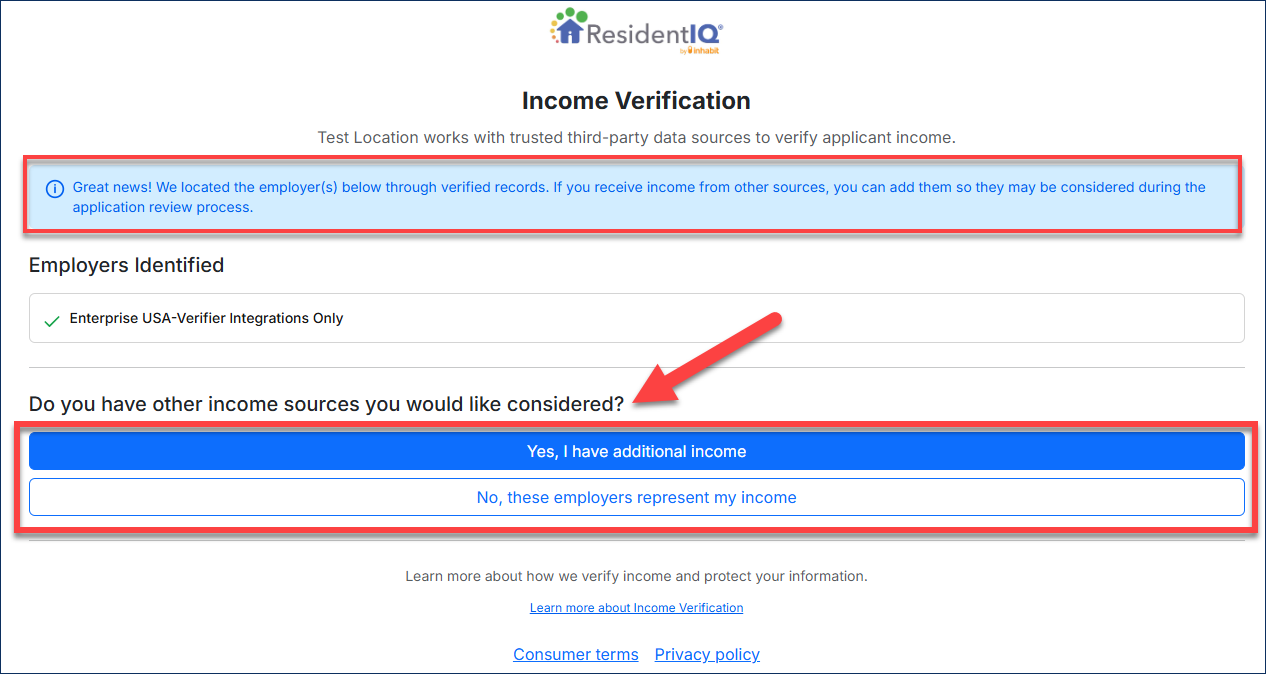
- If the income found through Equifax’s Work Number is Less than a 95% Match, the applicant will see the light blue message shown below. This message asks whether the applicant has any additional income sources they want to include with their application.
- By selecting Yes, I have additional income, the applicant will be presented with the Additional Income Verification Options outlined in the next section of this article.
- Selecting No, these employers represent my income allows the applicant to move forward to complete and submit their online application.
*Additional Income Verification Options - If Required*
Applicants may see these options when their income is not verified through Equifax’s Work Number or when they choose to add more income sources.
Option 1: Connect to Payroll Provider, Benefit Provider, or Bank
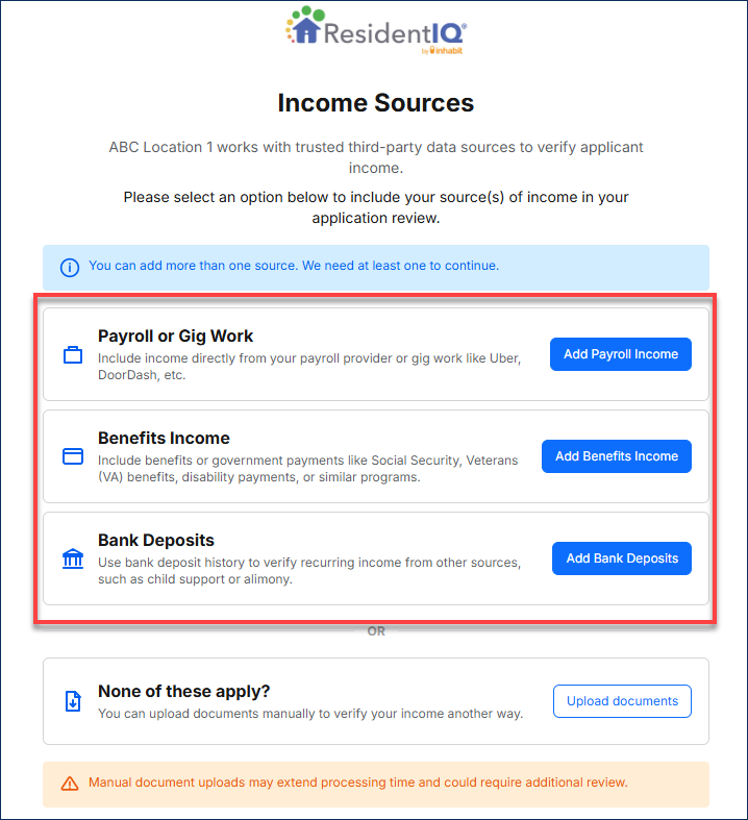
If the applicant’s income was not verified through Equifax’s Work Number, or if the applicant wants to include additional income, they are taken to the Income Source page. From there, they can securely connect to a payroll provider, benefit provider, or bank.
Steps to connect to the Payroll Provider, Benefit Provider or Bank:
A. Select the appropriate income source option and follow the prompts as the system guides them to securely connect to their selected income source. Once connected, data is retrieved and evaluated in real time.
*Tip: Check out this short video to see how argyle works within our application:
How to share your income and employment information with argyle.
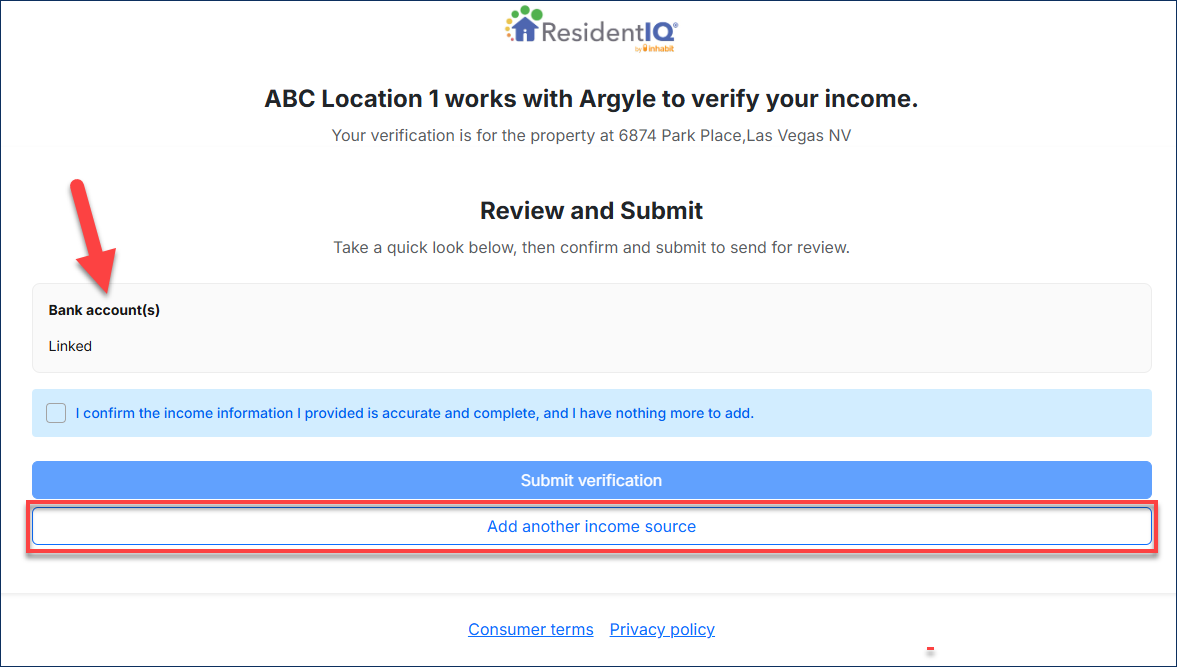
B. After successfully connecting to the selected income source, the applicant will see the linked source. They can select Add Another Income Source to connect another source or select Submit Verification to continue.
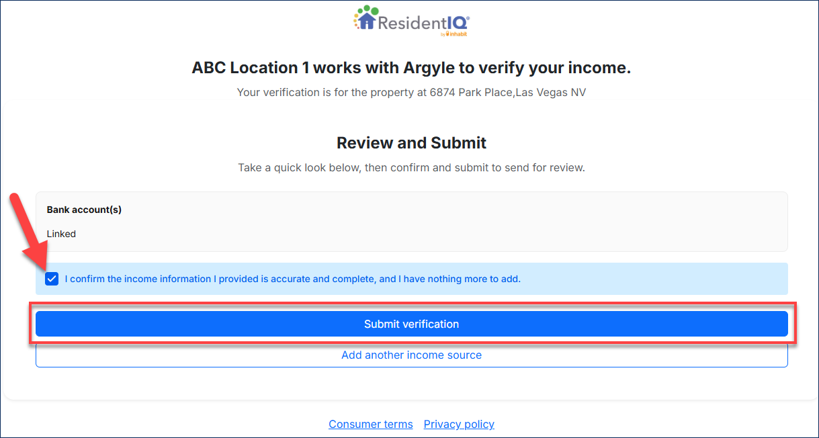
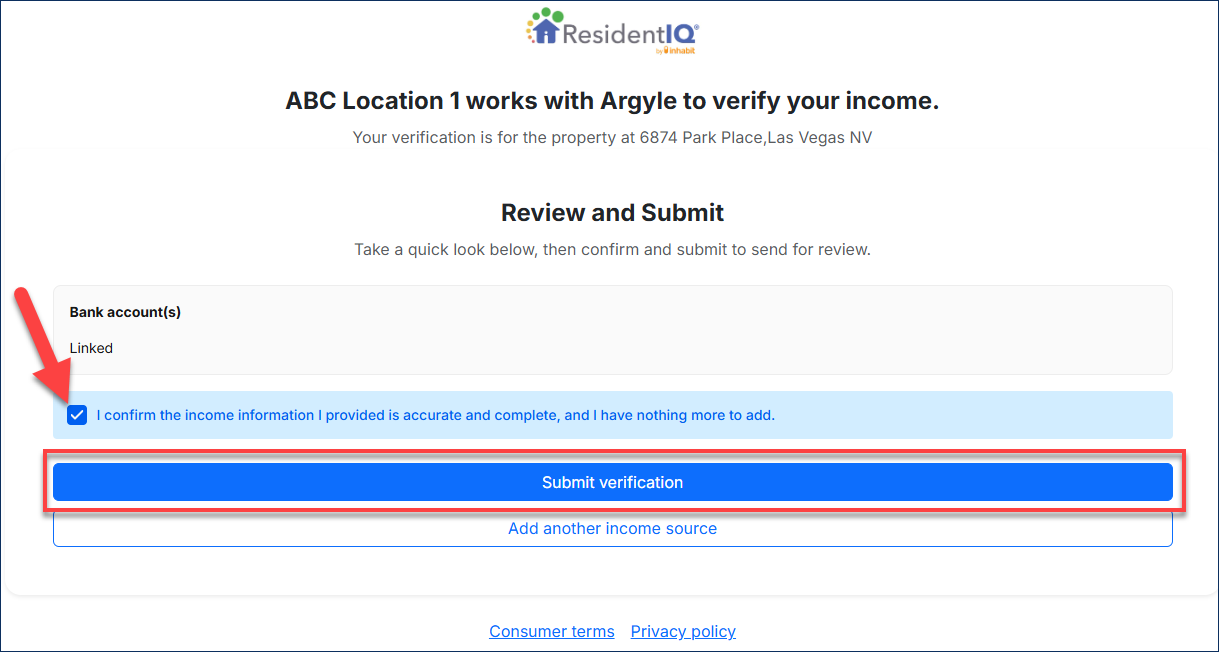
C. Once all income sources have been added, the applicant must select the checkbox confirming that the linked income sources are accurate and complete. They can then select Submit Verification.
Option 2: Upload Documents
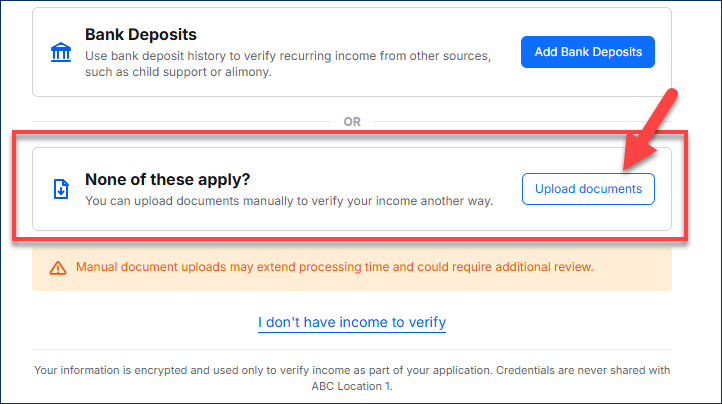
If the applicant's payroll provider, benefit provider, or bank provider are not available to provide details electronically, the applicant has the option to manually upload documents.
*Note: Documents that are uploaded will be available the applicant details panel within TenantTech. Site teams can access uploaded documents by selecting the applicant's profile in the program and selecting the menu option Notes/Attachments.
Steps to Manually Upload Income Documents:
A. Select the option to Upload Documents.
B. Click on the blue Upload Documents bar.
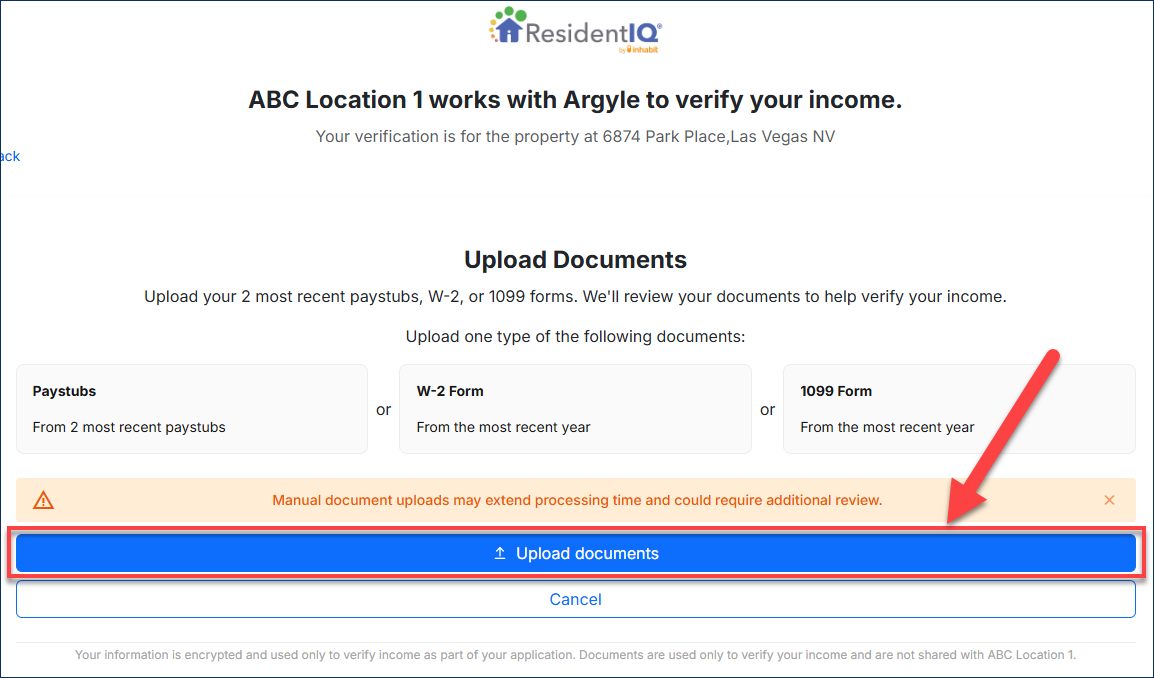
C. In the pop-up window, the applicant selects the type of income document they want to upload, such as Paystubs, W-2, or 1099. They then follow the prompts to upload the document.
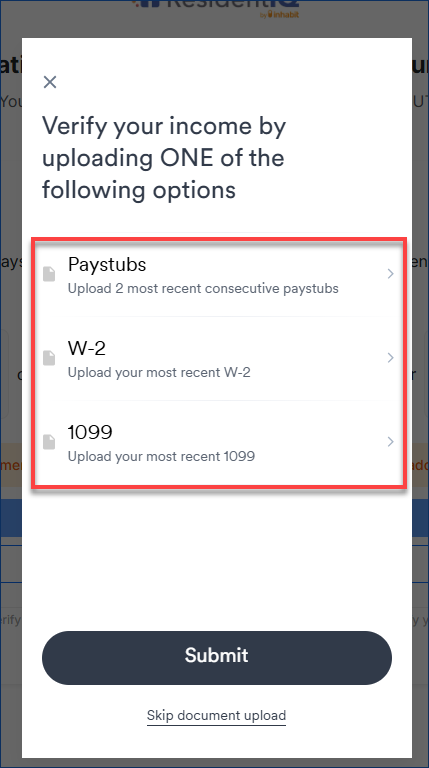
D. Once documents are uploaded, the applicant will automatically return to the upload window where they Submit their uploaded documents.
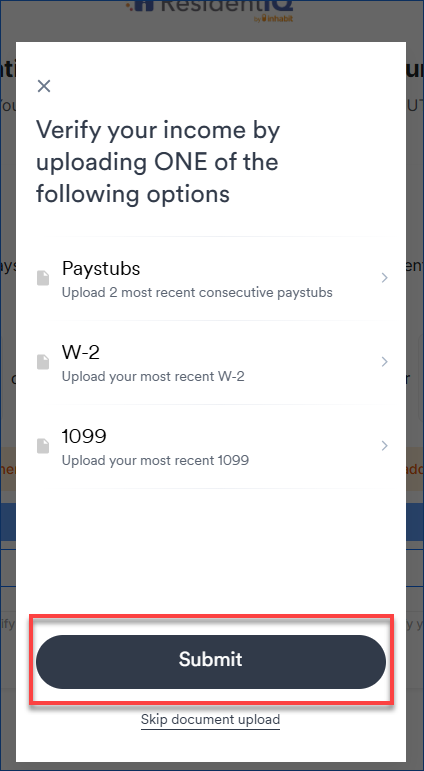
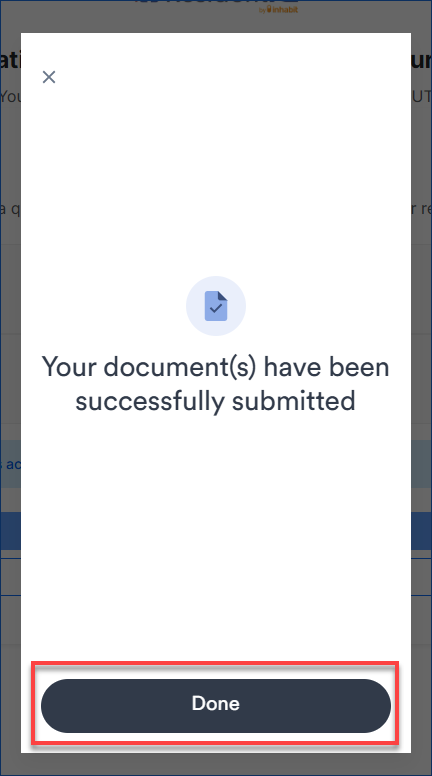
E. The applicant receives confirmation that their income documents have been successfully submitted, and selects Done.
F. The applicant then selects the checkbox confirming that the uploaded income documents are accurate and complete. They can then select Submit Verification and continues their online application.
Step 3: Complete the Application
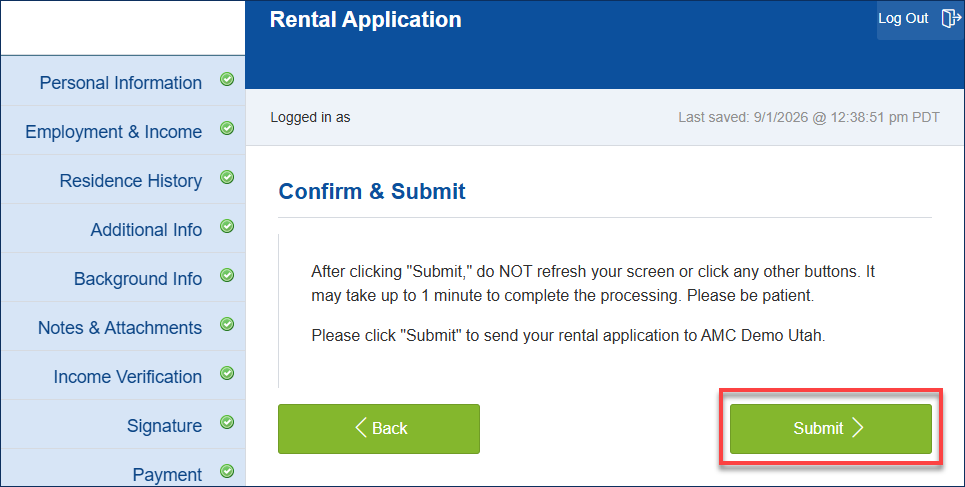
After completing the Digital Income Verification, the applicant continues through the remaining steps and submits the completed application.
For Property Management Teams: What to Know After an Applicant Completes Income Verification
This section is for leasing teams and property management staff to understand what happens on your side once an applicant completes income verification during the online application process.
Viewing Verified Income and Documents
- Uploaded documents are only available in TenantTech for applicants that connect to their Payroll Provider. Documents are not posted for those that connect to a Bank.
- Leasing teams can view uploaded income documents in TenantTech by opening the applicant profile and selecting Notes / Attachments.
- Leasing teams can view uploaded documents but cannot upload income documents on behalf of the applicant.
- If an applicant needs to change their income linked through Digital Income Verification / argyle, users should reach out to Western Reporting and request a new income verification link be manually sent to the applicant.
- Income from Digital Income Verification/ argyle isn't posted to or stored in TenantTech.
Key Things to Keep in Mind
- Income verification is completed by the applicant as part of the online application workflow.
- Leasing teams cannot modify, resubmit, or complete income verification steps for an applicant.
How This Impacts the Screening Process
- Using Digital Income Verification can help reduce manual income review and follow-up.
- Income verification results are available alongside other screening information for review.
- The overall screening workflow and review process remain unchanged.
- Digital Income Verification/ argyle allows applicants to upload documents in more file formats. We recommend uploading the original PDF but the integration will allow applicants to upload a print to PDF file.