TenantTech provides you with many time-saving property management features. Many of these features can be configured to meet your specific business needs. To accomplish this, you will need to spend some time configuring your TenantTech settings and this document provides instructions for the first step of that process.
You (the Company Admin) should have received your login credentials and have successfully gained access to the system. The settings that are highlighted in this document typically require some internal discussions with your team. Please follow these instructions to make the selections that best meet your business needs.
*NOTE: This is centered around the standard settings with Multifamily Northwest Forms. Other form settings may slightly differ. If you have questions, please do not hesitate to contact Customer Support at support@tenanttech.com.
Property Settings
- Basic information
- Office
- Rental Agreement
- Owners
- Pets
- Safety & Structure
- Parking & Towing
- Application/Screening
- Area Information
- Miscellaneous
- Smoking Policy
- Reminders
- Order of Forms
- Lease Planning
- Prospects
- Cleaning & Repairs
- Inventory
- Depreciation
- Utilities
The way that you access Property Settings will depend on whether you have a Multi-Property Account or a Single Property Account.
Accessing Property Settings - Single Property Account:
Select the Account Settings, found in the upper right corner of the screen.

Accessing Property Settings - Multi-Property Account:
Select Residents >> Properties/Units.

Select the property that you will be working on. When you select the property, it will turn a darker blue, and you can select the "Property Settings" option located on the right.

NOTE: Any settings/information entered or adjusted will ONLY apply to this specific property. For multi-property accounts, some settings may have an option to apply it to other properties as well, but it does not apply automatically.
Once you have accessed the Property Settings, the different setting categories (seen below) will be listed on the left side of the page.
Basic Information:
Allows you to set the Property Name, Marketing Name, and address. Also allows you to select if the property (based on the property zip code) is within the limits of cities/counties that have special forms for their location, such as Portland, OR, Gresham, OR, Clark County, WA, etc. If this is not selected, then the property may not have access to city/county-specific forms that are needed.

Office:
You can enter the contact information for the property. The information set/saved here will appear on some reports & forms. If you will be using the same contact information for more than one property, then you may choose to select the box in the upper right, which allows you to select the other properties within your Multi-Property Account you will be applying it to.

Rental Agreement:
This settings category contains many settings that can flow directly into your rental agreements. For this reason, we have broken each subsection into one of the bullet points below.
If you will be using all of the same rental agreement settings for more than one property, then you may choose to select the box in the upper right corner of the page, which allows you to select the other properties you will be applying it to.
- Execution Deposit: When an applicant is approved for a unit, they may have to pay an execution deposit. This setting determines if that execution deposit will be applied to the rent OR the security deposit and will be seen on the Execution Agreement document.

- Insurance: Use the radio buttons to select whether or not renters’ insurance is required for the property, then enter the minimum insurance amount the property requires.
- Real Estate Licensee: This is only applicable for some Rental Agreements, based on your company's operations.
- Minimum and Maximum Lease Terms: Allows you to set restrictions on the minimum and maximum lease requirements, in terms of lease length.

- Lease Provisions: Allows you to add any general special provisions for the property. When setting up the Rental Agreement, the agent/manager will see an option to "insert special provisions". When they click on it, these provisions will populate on the rental agreement.
- Special Garage Provisions: Allows you to add any provisions for garages within the property, such as“Garages are to be used for vehicles only…” . The provisions entered here will flow into both the Resident Garage and Storage Agreement and the Non-Resident Garage and Storage Agreement forms.
- Other Occupants: Check this box, if you would like "None" to appear on the Rental Agreement where there are no minor occupants. Otherwise, it will remain blank on the agreement.
- Vehicles: Check this box, if you would like "None" to appear on the Rental Agreement when the residents do not have any vehicle information. Otherwise, it will remain blank on the agreement.
- Early Termination Provision: Check this box if the property will be charging a fee for early termination and be sure to provide the fee in the “Amount” field.
- Fees: Allows you to set fees for tampering with smoke/carbon monoxide detectors, as well as any HOA fees.
- Late Fees: You select if the late fees will be charged as a flat fee, a per-day fee, or 5% of the stated rent every 5 days.

- Rounding: Allows you to determine if the property will round their totals, and how they will be rounded, when applicable.

- Pro-Rated Month: Allows you to select which month of residency (first or second month) the prorated rent will be collected.

- Pro-Rate Formula: This setting determines the formula used to calculate pro-rated amounts for the property.

- Lease Term Calculation: This setting will determine when the property's lease terms expire.

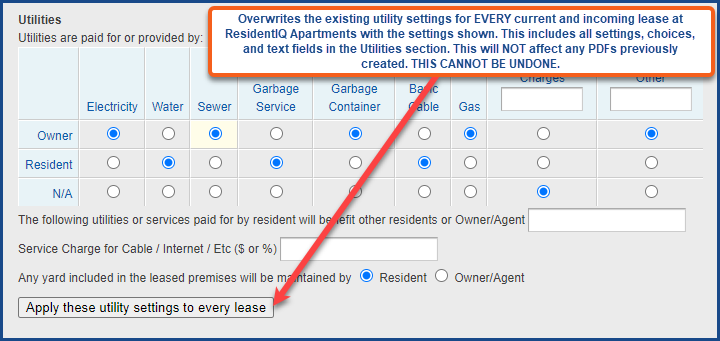
- Utilities: This allows you to select which utilities are the resident’s responsibility, which ones are paid by the property, and which ones are n/a.

OWNERS:
This allows you to enter and save owner information. You are also able to choose who/what will show up on Forms and Notices. Use the radio buttons to determine if the owner’s name, the property management information, or a custom name/address will appear.
*Important Note: If you choose the custom information option, then you MUST enter the custom information at the bottom of the page. Otherwise, the information will remain blank on the form/notice.

PETS:
Select whether or not the property will allow pets. If pets are allowed, then you can enter any additional Terms & Conditions related to pets. This information will appear on the Pet Agreement.

SAFETY & STRUCTURE:
This setting addresses lead-based paint and will flow to the Lead Base Paint Disclosure form.
Parking & Towing:
This is where you will determine how parking spaces are managed at the property (no parking, assigned parking, permit parking, etc.), monthly parking fees, and guest parking. Additionally, you may provide the towing company name and information. These settings and information will impact what is seen on the Parking Agreement.
Application/Screening:
This settings category contains many settings that can flow directly into your rental agreements. For this reason, we have broken each subsection into one of the bullet points below.
- Screening Company: Allows you to select the screening company the property uses.
- Income/Rent: If you have it, then it will allow you to set a minimum income-to-rent ratio requirement for the property. *Not all properties have/use this setting option.
- Screening Charges: This is where you will set the property's screening charge and fee amount(s). It is important to know that the amounts entered here do not include the fee charged by the payment processor.

- Online App Holding Deposit: If you have this setting option, then it will allow you to select if the holding deposit should be charged through the online application. *Not all properties have this setting option.
- Application Status Change: If the box is checked, then a reason will be required when an applicant's status is manually changed.
- Rental Criteria & Additional Forms: This is where you select whether the property will use the state's default criteria or custom criteria. If using custom criteria, then you MUST upload the criteria. *Important Note: If a custom Criteria is deleted for any reason, the system will automatically default to the state criteria for the state where the property is located.
- *Tip: If you are uploading the same rental criteria for every property, then you can set them all at once by going to Tools >> Company Application/Criteria.
- Co-signer Application & Criteria: this setting allows you to set a minimum rent-to-income ratio requirement for co-signers, if applicable.
- *Note: When applying online, the applicant MUST select "non-resident application" to get the co-signer application. Otherwise, they will be given the "resident application".
- Online Rental Application -- Welcome Screen: This allows you to choose between the default welcome message or creating your own custom welcome message to be displayed on the property's online application Welcome Screen.
- Online Application -- Deposits, Fees & Notes: This allows you to add notes that will be displayed to applicants on the left side of the Online Application page. For example, you could add a link to the property's website, add a note stating “Combined income must be 3 x rent or combined savings of 3 x 6 months’ rent", and so on.

- Online Rental Application -- Time to Rental or Deposit: Allows you to set a determinate amount of time (in hours) that an applicant will have, upon receiving their notification of approval, to either execute a rental agreement and make all deposits OR make a deposit to hold a unit and complete an agreement to execute a rental agreement.
- Online Rental Application -- Units: These settings will determine if an applicant will be required to select the unit they are applying for. In addition, you will be choosing settings that will determine how the units will be viewed by applicants when they are applying.

- Online Rental Application -- Invite Co-Applicants: If you would like the applicant to be able to invite another applicant to apply with them, then you will need to check this box. For more information about this feature, please review the article, Invite Co-Applicants Feature.
- Online Application -- Auto Email to New Applicant: Allows you to choose to use the default email message or create a custom email message that will be automatically sent to an applicant once they have initiated the application process.
- Online Application Custom Colors / Text Labels: This allows you to customize the appearance of the property's online application Welcome Screen. If you want to use the default settings, then do nothing. If you would like to customize the appearance then click the box next to "Use custom colors".
 Then adjust the options as you see fit, and Save.
AREA INFORMATION:
This allows you to list what services/utilities serve the community where the property is located, as well as the service’s contact information. This information may be seen on the Utilities Set-up & Transfer Agreement document.

MISCELLANEOUS:
Allows you to set integration codes and backend information for things like the property's time zone, mailbox numbers, electronic signatures for emails, etc. For more information related to mailbox numbers, please see the article Managing Mailbox Numbers.
For the E-Signature email text, you can enter & save the default email message.

When you have a document that is ready to be sent for signing, the saved/default message will automatically populate for you.

SMOKING POLICY:
The settings here will determine whether smoking is allowed anywhere on the property. If so, is smoking allowed anywhere or only in certain locations? These settings will impact what is seen on the Smoking Addendum document.

REMINDERS:
Allows you to set up property-level notifications specific to users.
*NOTE: Users MUST set up their preferences for notifications and reminders in their My Account section (found by clicking on their name at the top of the screen, when logged in).

ORDER OF FORMS:
Allows you to customize the order that the forms will print for this property ONLY, regardless of what order they are selected in “Forms & Docs”.

LEASE PLANNING:
Allows you to set limits on the number of leases that will be allowed to expire for each month in the year.

PROSPECTS:
This is where you can enter & see the traffic sources used for the property (i.e., Local Newspaper, Rent.com, Zillow, etc.) that show up in Prospects >> Guest Card: traffic source.

CLEANING & REPAIR:
These settings allow you to determine what a resident will be responsible for paying for cleaning and/or repairs upon vacating. The information entered here will be seen on the Wear & Tear Addendum.

INVENTORY:
Allows you to add items that are in common areas of the property, such as a pool table in a game room, fitness equipment in the property fitness center, appliances in a property clubhouse, etc.

DEPRECIATION:
Allows you to set the depreciation value for items relating to the Unit Inventory (typically used at move-in and move-out). If you are unsure how to create the Unit Inventory, please click here.

UTILITIES:
Allows you to select the appropriate utility options for the property and identify if there are any Flat Fees for the utilities. This information will impact what is viewed on the Utility Bill-Back Addendum. It does NOT impact what is presented in the "Utilities" section of the Rental Agreement. That information would need to be updated at Property Settings >> Rental Agreement (as noted above).
