*Note: If you do not see the same options shown in this guide, your TenantTech user class may not have permission to access the Utilities 2025 settings. You may contact you company Admin to confirm your user permissions or to make updates on your behalf.
Tenant Tech and Multifamily NW (MFNW) are introducing a new Oregon M047 Bill-Back Addendum, along with minor updates to the OR M001 and M201 Rental Agreements to ensure consistency and alignment.
This article covers the Oregon (M047) Utility Bill-Back Addendum settings. For instructions specific to the utility settings within the Oregon (M001/ M201) Rental Agreement forms, see the following articles:
Identifying Account Type
Users will need to identify the type of account to locate the utilities setting in TenantTech.
*Important Note: The instructions provided in this article apply ONLY to the Utility Bill-Back Addendum. These settings do not flow to the "Utilities" section of the Rental Agreement (Form M001 or M201).
Single Property Accounts:
Select Account Settings located at the top of the screen, then go to Step 1 below.

Multi-Property Accounts:
To get to Property Settings, go to the “Residents” tab, and select the Residents page from the dropdown menu.

Select the property that you would like to update. The selected property will turn a darker blue, and you will be able to click on the Property Settings option found on the right.

Utility Bill-Back Addendum Settings Instructions
Step 1:
Select the Utilities 2025 option at the bottom of the listed menu options on the left side of the page.

Step 2: Utilities at Property
Select the utilities available at the property. This determines which utility sections will appear in the Utility Key Assignments.

Step 3: Ratio Billing Method Key
The Ratio Billing Method Key defines the billing calculation methods you can reference later when setting each utility. Fill out any applicable methods in this key.
- If using the Bed × Bath option, enter the flat fee for each unit type shown. The form will display the flat fee that corresponds to the bed × bath configuration of the unit you’re generating it for.
- Note: If you are missing a unit type, ensure your unit information is set up correctly in Residents >> Units >> Edit All Unit Info. For instructions, see Knowledge Base article Quick Guide - Edit Units.

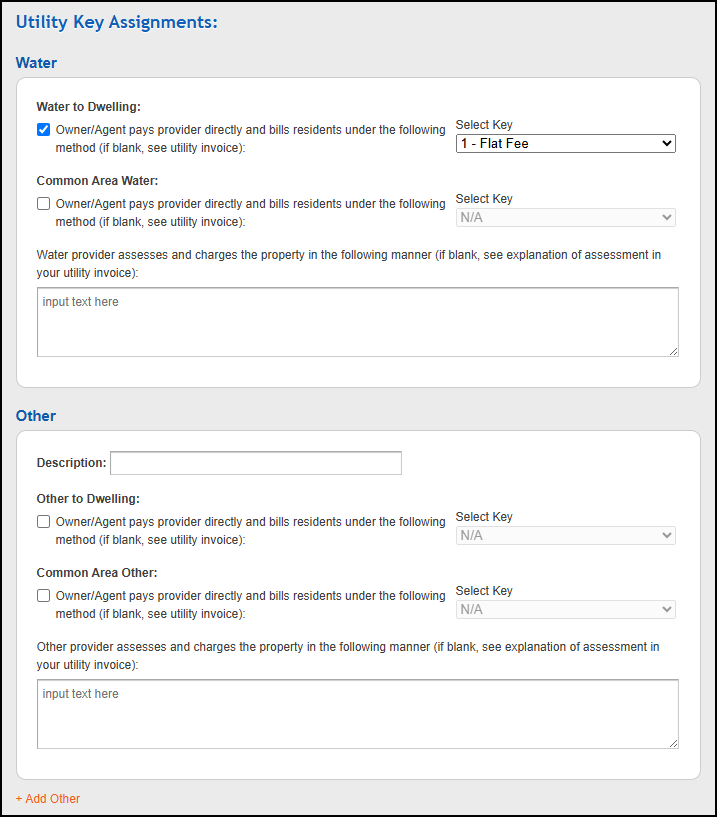
Step 4: Utility Key Assignments
- Reminder - If you don’t see a utility listed here, go back to Step 2 and make sure it’s checked so it appears in this section.
- If you have a utility type that isn’t captured in Step 2, you can use the Other option to add it. You can add up to three “Other” utilities.
Step 5: Additional Terms

Step 6: Save

Click here to review - Sample of M047-NEW OR Utility Bill-Back Addendum SAMPLE.pdf
Troubleshooting:
Incorrect Property or Residential Information
If the Property Name, Property Number, or Resident Name(s) do not appear correctly on your Utility Bill-Back Addendum, use the following Knowledge Base articles to correct them.
- Property Name - Updating the Property or Account Name
- Property Number - Adding or Changing your Property Number
- Resident Names - How to fix a Co-Signer that Appears as a Resident